:focal(smart))
Build C++ projects with Pixi
Building a C++ Application with Pixi
Painless dependency management (including shared libraries), monorepos, and CI/CD is here for CMake projects with Pixi.
Pixi is a powerful package manager that nowadays is also able to build software. Through the new pixi-build-cmake backend, we have first-class support for C++. The pixi-build feature is currently available as preview.
For C/C++ developers, this means you'll be able to go from source code to a cross-platform shareable package in no time!
Our meta-buildsystem replaces long READMEs with complicated cmake / make / ninja / ... invocations through a simple pixi install on Windows, macOS and Linux.
Painpoints we are addressing
Making your C++ package work with other languages like Python or Rust comes easy.
The conda ecosystem is a cross-language package system. With pixi-build you can seamlessly turn your project into a package that you can distribute!
No need for complex dependency management for cross-platform C++ projects. Pixi comes with a SAT solver to resolve complex dependency trees and creates lockfiles.
Pixi splits the installation of
buildandruntime dependencies so you'll not have to worry about not having the right packages at the right time.
Share your own packages, publicly or privately, without complex distribution workflows.
This becomes even easier with our offering: prefix.dev/channels
How it works
Pixi offers a declaritive system through build backends. One of the build backends that we are starting out with is the pixi-build-cmake backend that knows how to configure, build and install a CMake project.
Thanks to the build backend doing the majority of the work, making your CMake project "pixi-ready" is as simple as adding a pixi.toml at the root of your project. There you declare metadata and which additional dependencies are needed.
For example, this is a pseudo package definition:
[package]
name = "my-package"
version = "0.1.0"
description = "My cool package"

[package.build.backend]
name = "pixi-build-cmake"
version = "*"

[package.build.config]
# Add CMake configuration options
extra-args = ["-DCMAKE_BUILD_TYPE=Release"]

[package.build-dependencies]
# Add additional build dependencies like pkg-config

[package.host-dependencies]
# Add dependencies on (header-only) libraries such as `fmt` at compile time

[package.run-dependencies]
# Add run dependencies for your package such as SDL2
...
For a real example, follow this example.
There are tons of C/C++ libraries (shared libraries, header-only and everything in between) readily available on conda-forge, for Windows, macOS and Linux, such as Eigen3, OpenCV, xtensor, fmt, reproc, pybind11, ...
Install any package from source!
With Pixi-build you can install packages from source, which is also useful in a monorepo-scenario.
pixi global install --path ./path/to/my/package
pixi global install --git https://github.com/my-friend/their-cool-project.git
This does require a Pixi manifest in the repository, which might not be required in the future.
Build and upload to your channel!
You don't need to write conda recipes anymore – just use Pixi to build and upload your package to your channel.
cd path/to/my/package
pixi build
# Successfully built package my-package-0.1.0-h1234567_0.conda
pixi upload prefix.dev/my-channel my-package-0.1.0-h1234567_0.conda
Because all the "build magic" happens in the backend, you don't need to worry about the setup of a recipe that will be done automatically.
Use recursive source dependencies!
Develop your own libraries and use them as dependencies in other projects. Without even having to upload them to any channel first.
Pixi will orchestrate building them in the right order!
...
[package.build.backend]
name = "pixi-build-cmake"
version = "*"

[package.build-dependencies]
my-special-build-tool = { path = "../my-special-build-tool" }

[package.host-dependencies]
my-special-library = { git = "https://github.com/my-friend/their-cool-project.git", branch = "main" }
This is great for local development when using bigger monorepos or multiple libraries in one application.
How does it work?
Pixi-build has taken a lot of inspiration from the Python packaging ecosystem.
We took care to keep the barrier of entry as low as possible.
Our vision is as follows:
Getting started should be easy
Using existing build systems should be straightforward
Extending the system should be simple
To achieve this, we took the idea of "Build Backends" from PEP 517 and adapted it to our needs.
Build backends are responsible for the actual building of packages, while Pixi serves as a frontend for specifying which packages to build, and any relationships between those packages.
The implementation in Pixi is extensible for custom build backends, which allows maintainers of build systems to provide first class support for their build system within the framework of Pixi-build.
Build Backends
Currently, we provide the following build backends:
pixi-build-cmakeBuild CMake packagespixi-build-pythonBuild Python packagespixi-build-rustBuild Rust packagespixi-build-mojoBuild Mojo packagespixi-build-rosBuild ROS packagespixi-build-rattler-buildGeneric backend for any build system, as you can use a normal conda recipe.
The documentation can be found here.
We are actively working on more backends and would love to hear your feedback and contributions!
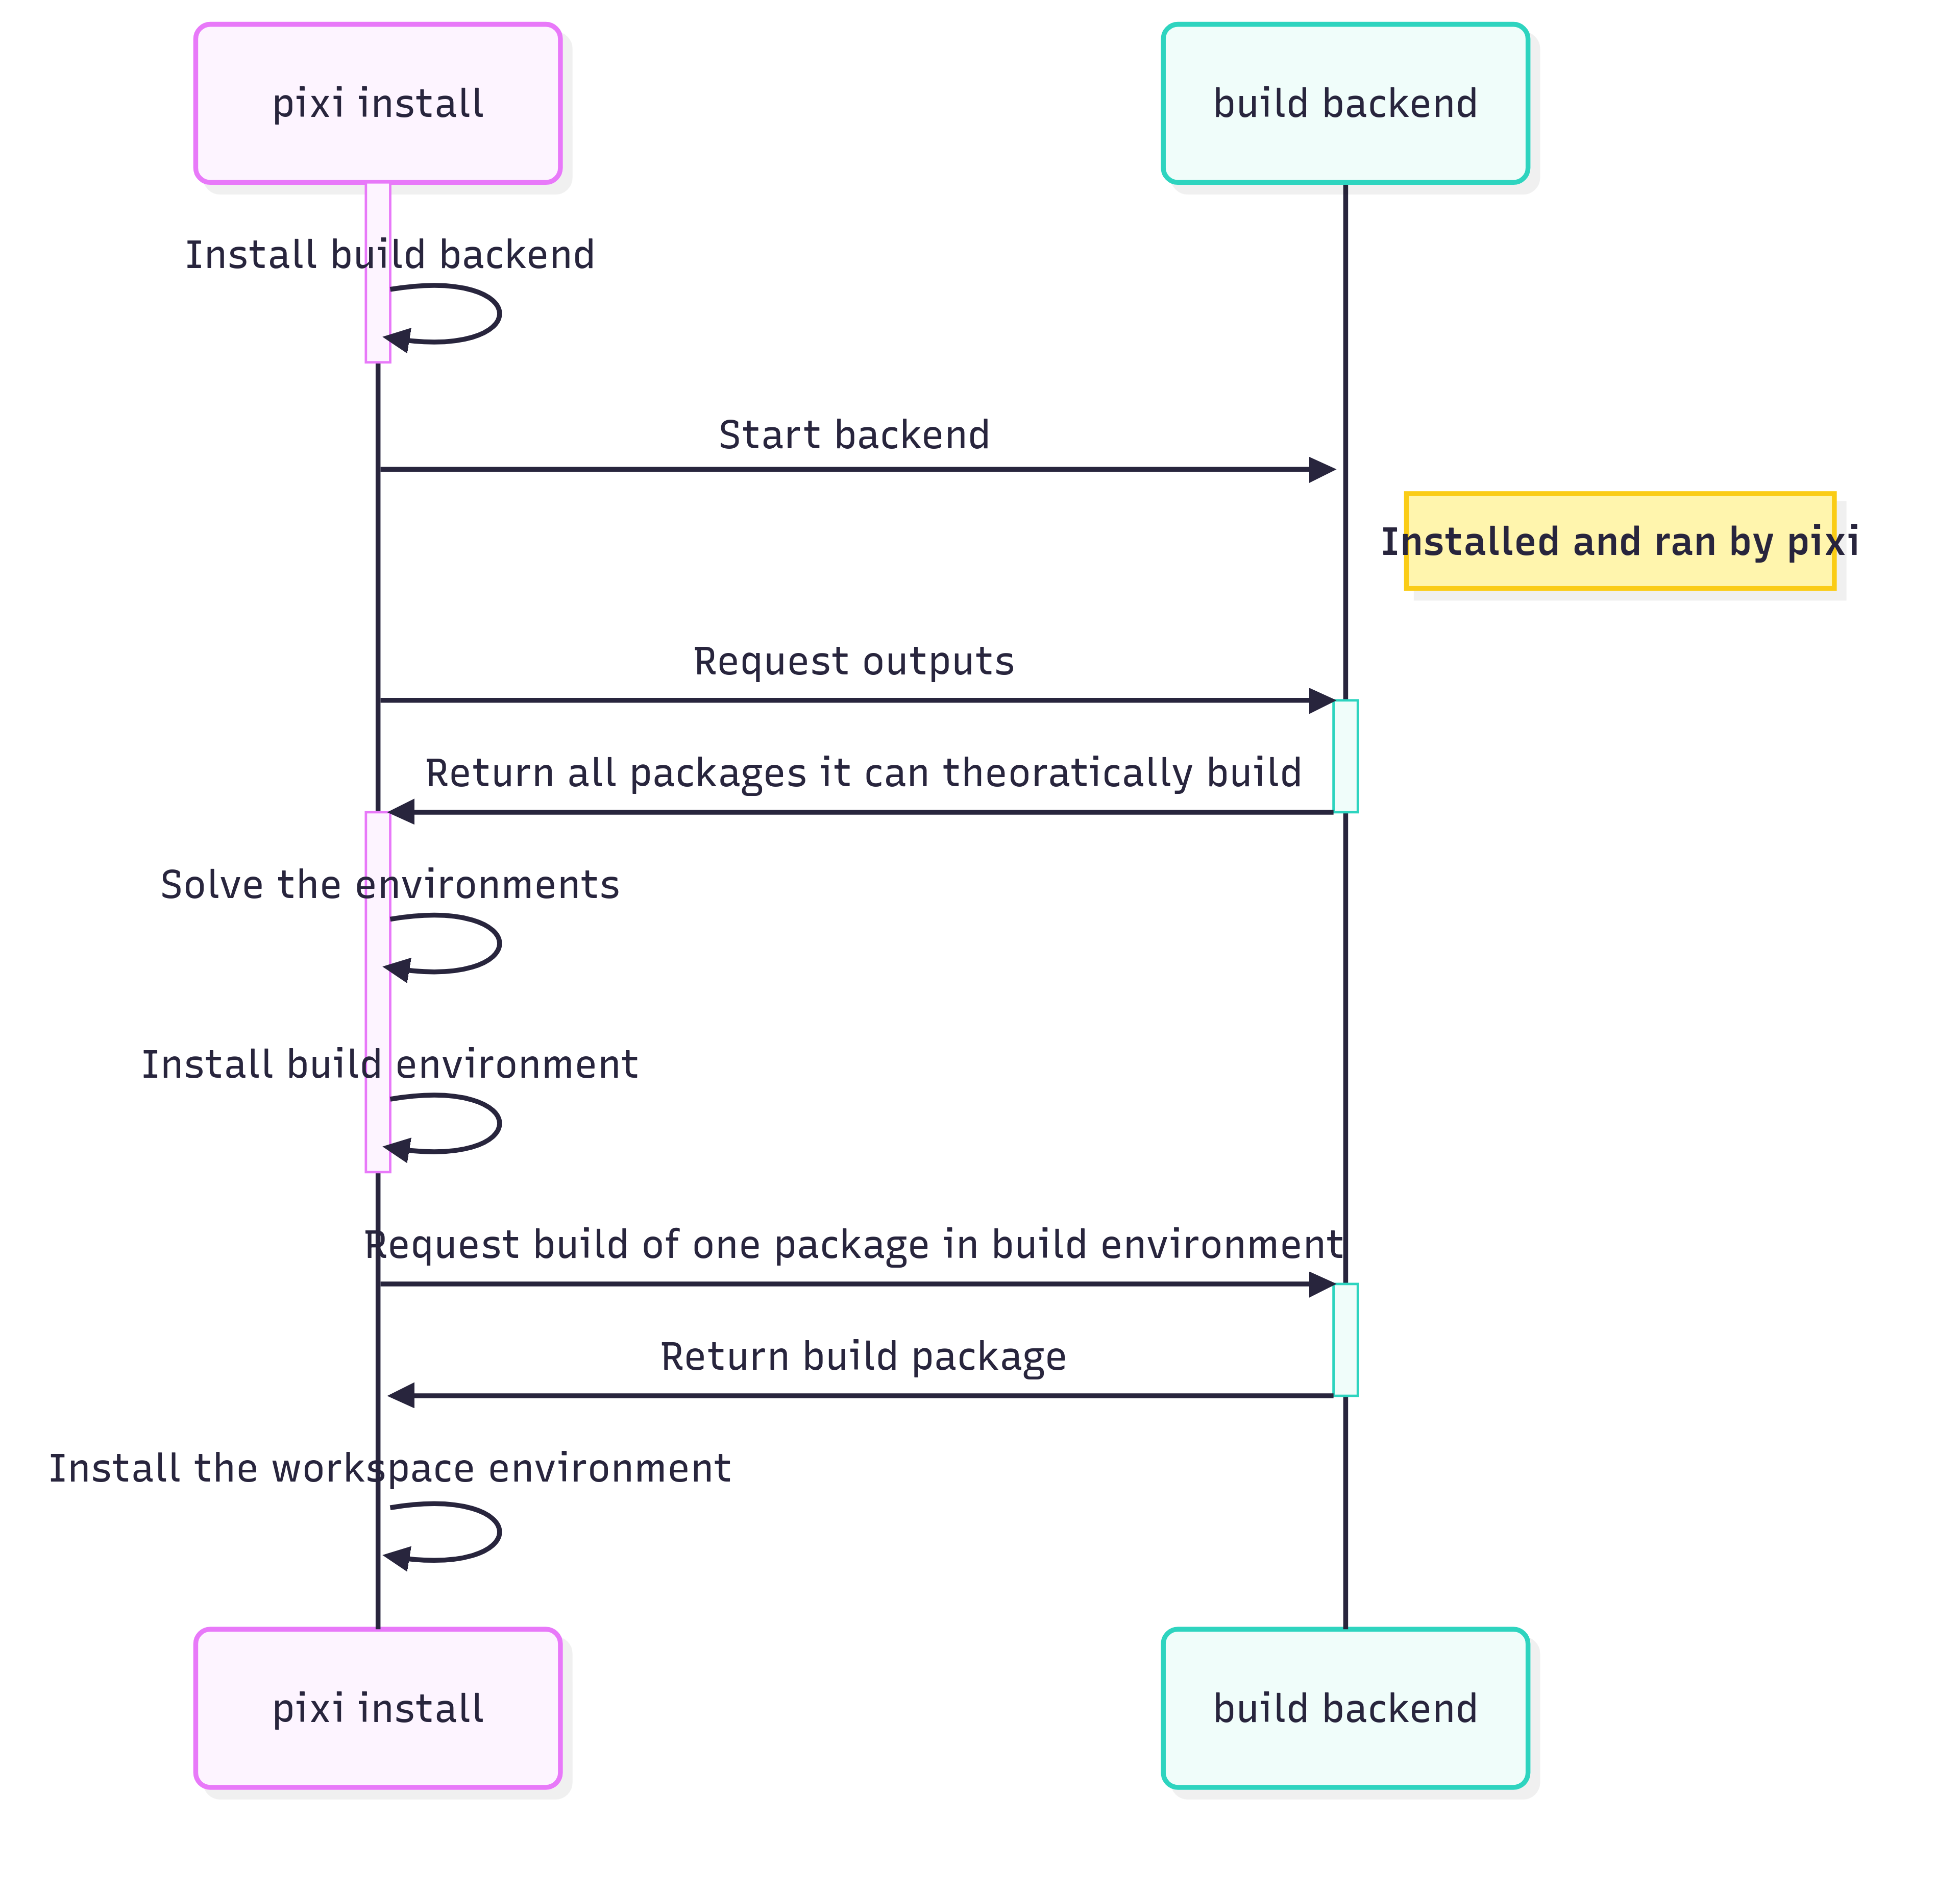
Pixi will take care of the instantiation of the backend and the resolution of dependencies.
Here is a simple diagram sketching the runtime architecture:
The pixi-build-cmake backend
The most important backend for C++ developers would be the pixi-build-cmake. There are some C++ and CMake specific configuration that you can set. If you have customizations that involve more than just the configuration it provides, you can fork the backend and modify it to your needs.
How to control the compiler flags?
You can control the CMake flags via the extra_cmake_args option in the pixi.toml file.
[package.build.config]
extra-args = [
    "-DENABLE_TESTING=ON",
    "-DCMAKE_CXX_STANDARD=17"
]

# Or target specific flags
[package.build.targets.linux.config]
extra-args = ["-DCMAKE_BUILD_TYPE=Debug", "-DLINUX_FLAG=ON"]
Any extra field or configuration can in theory be passed to the build backend, we're open to contributions to make this experience better!
How to use different compilers?
The only default compiler tools pixi-build-cmake provides are cmake and ninja.
The rest of the tool chain is up to you.
The required compilers can be configured via the compilers field in the pixi.toml file.
[package.build.config]
compilers = ["cxx", "c"]
Note: this will use the default compilers (gcc on Linux, clang on macOS and MSVC on Windows). It's possible to modify the compilers as part of the "variant configuration" in pixi build, for more info checkout the rattler-build documentation.
Examples
SDL2/OpenGL C++ Project
In this example, we'll take a look at a simple C++ project that uses SDL2.
The link to the full example can be found here.
Important parts of the pixi.toml file:
# Define the backend to use for building the package.
[package.build.backend]
name = "pixi-build-cmake"
version = "*"

# The dependencies of the project.
[package.host-dependencies]
# This ensures that SDL2 is available at build time.
sdl2 = ">=2.26.5,<3.0"
Due to the smart dependency resolution of pixi, it will ensure that SDL2 is available at build time and runtime. This logic is called "run exports" which is defined on the sdl2 package. So when it's used as a host dependency, it will also be available at runtime.
More info here
To test this package yourself, you can run:
git clone https://github.com/prefix-dev/pixi.git
cd pixi/examples/pixi-build/cpp-sdl
pixi run start
What you will see is a window popping up built with SDL2.
While this is a very simple example, it is not a trivial task to achieve with other package managers. This works on Linux, MacOS and Windows out of the box. Without needing anyone to read a manual or preinstall anything except for Pixi, and the MSVC toolchain on Windows (because we're not allowed to redistribute that, yet ;) ).
OpenCV C++ Project
OpenCV is a widely used computer vision library.
They provide prebuilt binaries, but you might want to build it yourself with custom options or patches.
Because their setup is already done quite perfectly, we can just use the pixi-build-cmake backend to build our own version without needing any custom configuration.
Clone their repository:
git clone https://github.com/opencv/opencv.git
cd opencv
Now create a
pixi.tomlfile in the root of the repository with the following content:pixi.tomlpackage definition:
[package]
name = "opencv"
version = "1.2.3"

[package.build.backend]
name = "pixi-build-cmake"
version = "*"
To test the build of the package, let's add a
workspaceto the samepixi.tomlfile.
This allows us to define tasks that can be run in the context of the package.pixi.tomlworkspace definition:
[workspace]
channels = ["https://prefix.dev/conda-forge"]
platforms = ["win-64", "linux-64", "osx-64", "osx-arm64"]
preview = ["pixi-build"]

[dependencies]
opencv = { path = "." }

[tasks]
version = "opencv_version"

[tasks.visualize]
cmd = "opencv_visualisation --image={{ image }} --model={{ model }}"
args = [{arg = "image", default = "samples/data/HappyFish.jpg"}, {arg = "model", default = "data/haarcascades/haarcascade_eye.xml"}]
description = "Run the OpenCV visualization example, using the provided image and model."
Now you can install the workspace directly.
pixi install
You don't have to call pixi build directly, because pixi install will take care of building the package and installing it in the workspace environment, because of the opencv = { path = "." }
Now you can run the opencv_version task to see the version of OpenCV that was built.
pixi run opencv_version
# Or use the predefined task
pixi run version
You can also run the visualize task to see the OpenCV visualization example.
pixi run visualize

# Or with your own image and model, paths are relative to the workspace root:
pixi run visualize samples/data/gradient.png data/haarcascades/haarcascade_smile.xml
It's actually enough to use pixi run instead of the pixi install + pixi run combo, because pixi run will automatically install the workspace if it is not already installed. It will also note the exact dependencies used in the lockfile.
Future developments
Pixi-build is still under heavy development, hence why we're calling this a preview feature.
Here are some of the things we're working on:
Improving the developer experience of writing your own custom build backends.
Improving the customizability by growing the API.
Adding more documentation and examples.
Improving the developer experience when using
pixi build.Create more tools to debug builds.
pixi testto run tests in specialized environments.Create test environments per package
Run tests on the packages in a predefined way with automated standardized results.
pixi publishfor recursive publishing of packages to a channel.And as always, faster faster faster!
What about Conan and vcpkg?
These package managers are great, in the end all packaging tools are trying to solve the same problem.
"Make developing software easier for everyone"
This blog post focuses on the integration into C++ workflows, but Pixi is not only for C++.
It works great for Python, Rust, Mojo and more – as it is really a "meta-buildsystem".
Streamlining the experience over multiple languages and platforms is our main goal.
This means we've had to develop our own approach to solving these problems. We see a lot of potential in integrating with these existing package managers.
If you're heavily invested in these ecosystems, we would love to hear your thoughts on how we can work together to improve the experience for everyone!
Want to learn more about conda packaging?
We've got some more blog posts that explain in detail how different parts of the ecosystem works:
Another awesome resource is the Conda-forge Knowledge base
Get involved!
We're actively working on improving the experience and would love to hear your feedback and contributions!
Star us on GitHub
Report issues or request features on GitHub Issues
Follow us on Twitter/X
Join our Discord and ask questions or give feedback.
Contribute to any of the related projects: