:focal(smart))
Introducing Online Environment Solving
At prefix.dev, we want to advance the packaging ecosystem. Now we're making it easier to create and share virtual environments that can be used with the mamba/micromamba
package manager. This improves and accelerates development workflows and fosters collaboration with coworkers.
To that end, we would like to introduce our newest feature: Online environment solving.
What is an Environment?
But let's take a step back. What do we mean by a virtual environment? If you don't have time to read our documentation, then here is a quick summary:
A virtual environment is a collection of packages, which can be managed and updated with the mamba package manager. Virtual environments are often used to create a custom environment of packages that are specific to a particular project. This helps avoid version conflicts between different projects and allows developers to manage their own environment without having to rely on the system default packages. It also improves collaboration because we know that we can “share” this exact environment between developers.
Note
Did you know you can browse what packages are available on conda-forge and bioconda by using the package view on prefix?
How is an Environment Created?
The steps to create an environment on your local developer machine are roughly:
Download multiple
repodata.jsonfiles, which are essentially the indexes of a channel.Parsing the data and the environment specification to begin solving for the specific environment specification.
Determining which packages need to be installed, updated, or deleted to create the actual environment.
Downloading these packages to a cache.
Installing these packages by linking the from the cache into the designated directory.
To use this environment, you can activate it by following the instructions here. Then you're good to go!
Back to Online Environment Solving
We've noticed that a few steps in creating virtual environments take time, so we've decided to build something to speed up the process. Our first iteration will do steps 1 to 3 for you, so you can essentially skip the solving step when re-creating the environment. The output is a conda-lock file. This can be used with the mamba package manager directly using the URL we provide.
How to use it?
To use this feature you need to create an account on prefix.dev. You can also connect with Github or Google. Use the sign-in button on the home page. After you’ve done this, you can click on the environments button on the home page.

You are then presented with the page of the environments you have created. This is still empty, which is great! Let’s create a new environment.
By pressing the new button we can create a new environment.
Let’s use the environment.yml from the numpy project.

We then proceed to give the environment an optional description and select the platforms we wish to solve for. We can observe the environment being solved online. An environment can have various 'versions', where we can alter the dependencies or the platform. Currently, the environments are behind a namespace defined by your username. That ensures they are unique over users.
Inspecting an environment
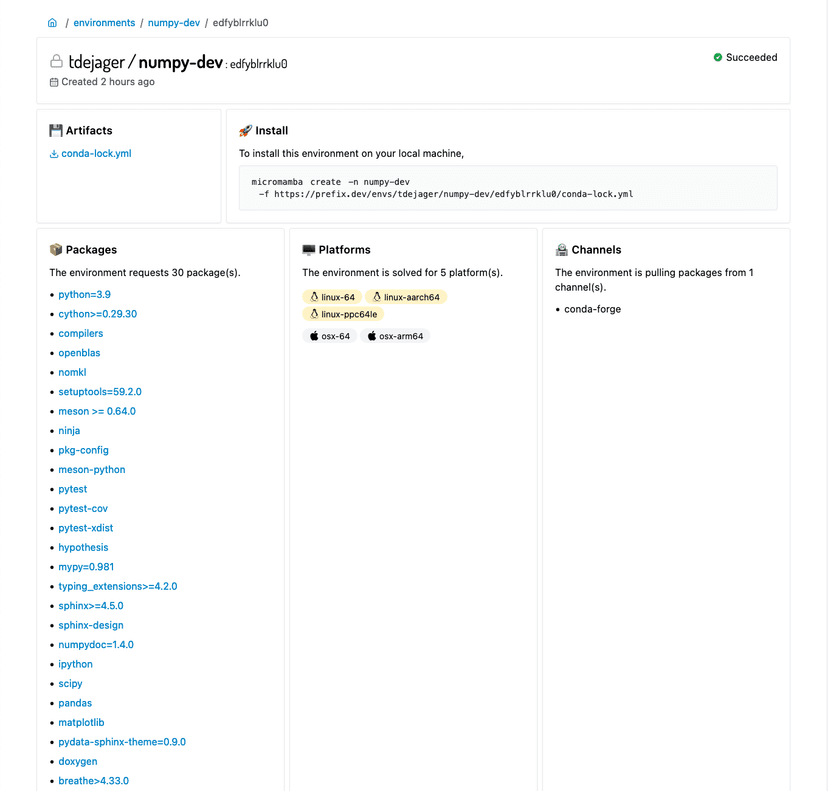
To inspect an environment, you can click on the environment version. And you get a page that looks like the following:

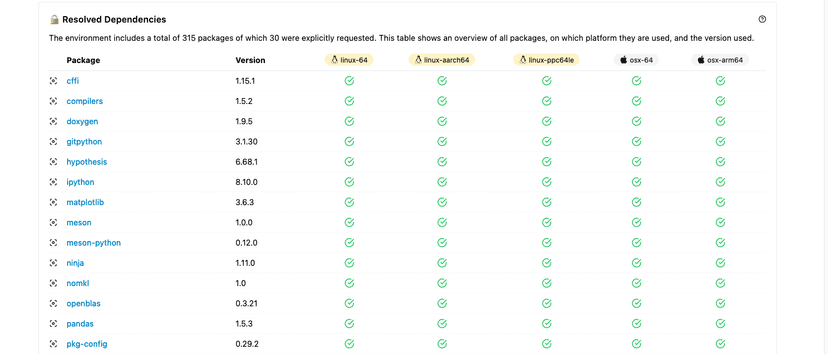
This shows you an overview of the requested packages, platforms and channels. When the environment has been solved successfully we also see the following table:

I’ve only added part of it in the image, but the table renders a conda-lock.yml file that shows you what packages have ended up in the lock file.
Creating the environments locally
To create the environment locally, run the command shown in the installation box:
micromamba create -f https://prefix.dev/envs/tdejager/numpy-dev/edfyblrrklu0/conda-lock.yml -n numpy-dev
This assumes you have micromamba installed. This is what it looks like on my machine locally:
Speed-up
So after all of this, does this result in a signification speed-up when compared to doing everything locally? Testing with the time commands and a filled package cache gives me these two results:
Doing everything locally:
time micromamba create -f ~/numpy-env.yml -n numpy-dev -y
________________________________________________________
Executed in   20.00 secs    fish           external
   usr time   11.04 secs    0.30 millis   11.04 secs
   sys time   11.22 secs    1.37 millis   11.22 secs
With the generated lock file:
time micromamba create -f https://prefix.dev/envs/tdejager/numpy-dev/edfyblrrklu0/conda-lock.yml -n numpy-dev -y
________________________________________________________
Executed in   15.42 secs    fish           external
   usr time    7.45 secs    0.30 millis    7.45 secs
   sys time   10.57 secs    1.46 millis   10.57 secs
Note that I've ran micromamba clean -i in between to simulato doing a repodata fetch. This step is skipped when resolving from a lock file. Most interestingly is the first line Executed in: which shows the real time that it took to execute this command, this gives us a speed-up of 5 seconds. This is a modest speed increase, but provides us with an excellent base to make things faster. Don't worry we have a lot of ideas on how to improve this in the future!
Limitations
We're still working hard on environment management in the cloud – some limitations are:
Environment lock-files are currently accessible for everyone and we do not have a granular sharing / permission system.
Environments can also not be deleted right now.
And lastly, we also need to improve our error messages.
Selectors like
sel(win)are not yet supported.Pip packages can also be listed in an
environment.yamlare currently not supported (by our platform, micromamba does support this).
But we promise that we are working on all these features.
We want your Feedback!
We wanted to release a version early so that people could test it. So while we definitely do not consider this the final version; we think it is a good stepping stone to get started and gather feedback. Please use our issue tracker for any issues you encounter and for any feature requests that you have or limitations that you would like to see removed first. We would love to hear any feedback that you have. You can reach us on twitter, join our Discord, send us an e-mail or follow our GitHub.
Thank you for taking the time to read this blog post!