
7 Reasons to Switch from Conda to Pixi

If you've been following me for some time you know that I've been working in the package management / conda ecosystem for a while. I've been leading the development of mamba – a reimplementation of conda in C++ – which is now included in conda as the default solver and is used in practically all of conda-forge.
As much as I love the conda ecosystem – it’s the only truly cross-platform and language agnostic package management solution – it can be slow and lacks some of the critical capabilities, such as lockfiles, that every developer needs to work more efficiently.
At prefix, we’re solving conda users’ pain points with pixi – a package manager that’s 10x faster than conda, integrates with PyPI package world much more deeply, eliminates unnecessary steps, allows you to use tasks for collaboration, and more.
The goal of mamba was always to be a drop-in replacement for conda. With pixi, we are going a step further with a more opinionated workflow. Pixi is written in Rust, is up to 4x faster than micromamba, and natively supports lockfiles and cross-platform tasks.
Drawing on inspiration from Poetry, Cargo, and others, we are excited to bring the most powerful package manager to conda users!
Let’s go over a few reasons why you should consider switching from conda to pixi. I’ll also show you how you can switch in just 2 quick steps.
Painlessly switching from Conda to Pixi
Up to now, switching to pixi was not very easy because one had to manually
convert the environment.yml file to a pixi.toml. Our latest release makes it
easier than ever to migrate from Conda or Mamba to pixi. A single command pixi init --import ./myenv.yml should bring all dependencies from an existing conda
environment.yml file to a newly created pixi.toml.
Once all dependencies are imported, pixi creates a lockfile and installs all
dependencies into a local environment (in a hidden ".pixi" folder). Immediately
after, you can run commands in the environment by using pixi run <command> or
start a pixi shell with the environment activated.
Reason 1: Work faster
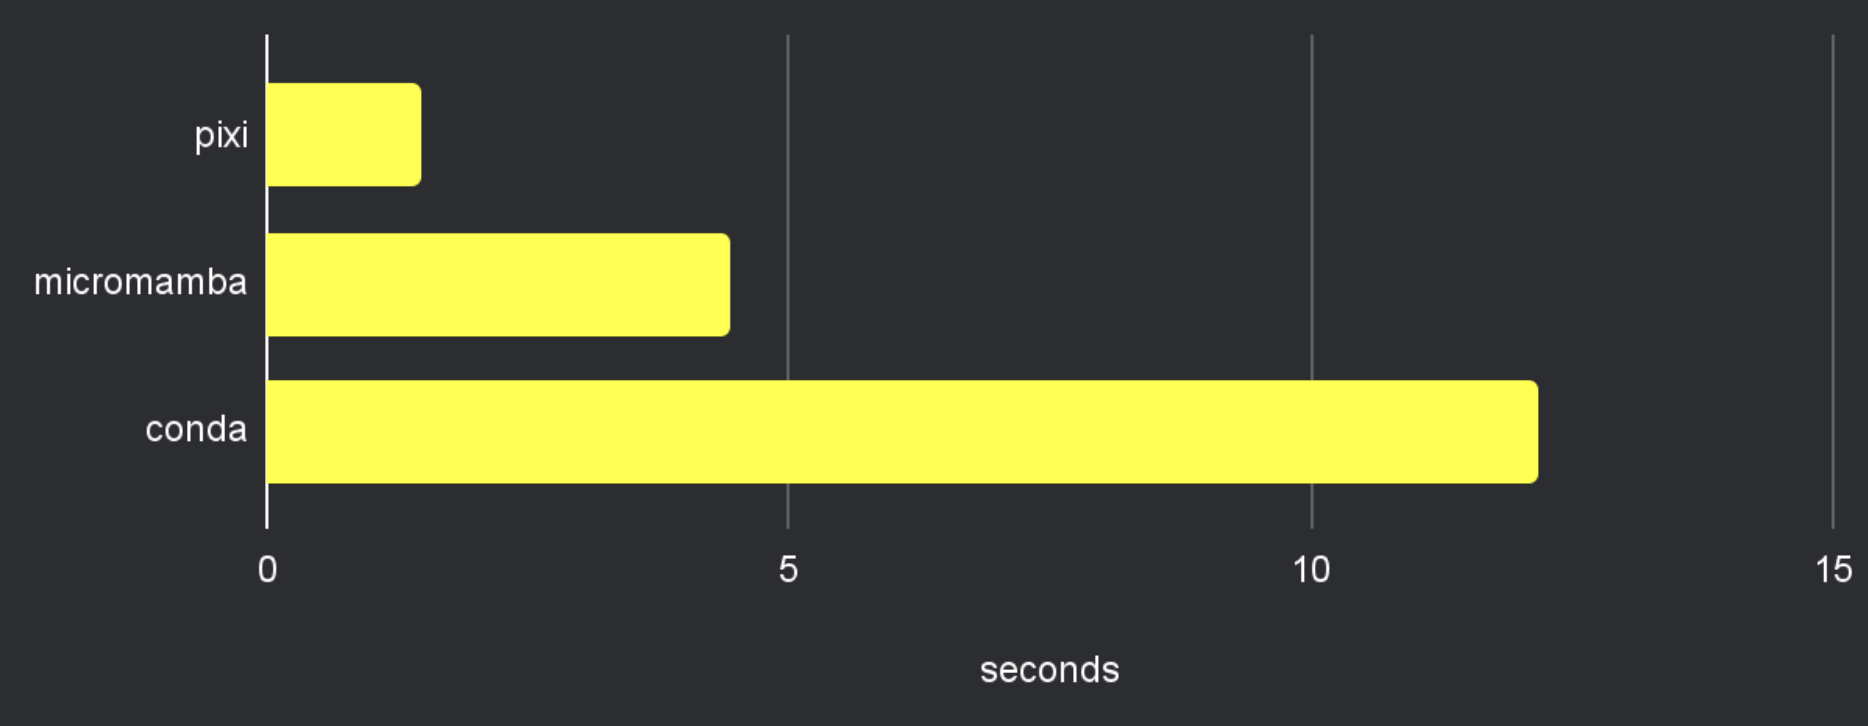
We took great care to make pixi extremely fast. We use Rust’s async to download, resolve, and install packages in parallel and as fast as possible. Our benchmarks show that pixi is about 3x faster than micromamba and over 10x faster than conda when resolving and installing an environment from scratch (on a M2 MacBook Pro).
Reason 2: Better integration with PyPl
In comparison with conda, pixi integrates PyPI package handling much more
deeply. This is a feature we’ve commonly seen "in the wild" and we want to make
sure that pixi users get the best of both worlds: conda and pip. For this reason
we are resolving PyPI packages in Rust, using a native resolver (called
uv). We also lock the PyPI packages alongside the conda
packages for real reproducibility.
In your pixi.toml you can define PyPI dependencies like this:
# define some PyPI dependencies in a pixi.toml
[pypi-dependencies]
requests = ">=2.26.0"
Reason 3: No more Miniconda base environment
The code-base of pixi is built on top of rattler - a set of Rust crates for conda package handling. Pixi is a statically linked binary that uses the same low-level library as our other projects: the prefix.dev website, pixi, and rattler-build (our conda-build alternative).
We have optimized it carefully for speed and compatibility. There is no messy base environment or Miniconda/Miniforge shell script installation – just drop pixi anywhere and off you go!
To install pixi, you just need to execute:
# Linux & macOS
curl -fsSL https://pixi.sh/install.sh | bash
# Windows
iwr -useb https://pixi.sh/install.ps1 | iex
Reason 4: Install your favorite tools globally
Pixi has no global base environment, which is a constant source of frustration
for conda users. Instead, pixi can install packages globally for commonly used
CLI tools, such as git, bat, rg (ripgrep), bash, and many other
utilities that can be found on conda-forge. Each
globally installed tool lives in its own isolated environment, so there is no
risk of a corrupted "base environment".
$ pixi global install git bash ripgrep bat
✔ Installed package bash 5.2.21 h15d410d_0 from conda-forge
✔ Installed package ripgrep 14.1.0 h5ef7bb8_0 from conda-forge
✔ Installed package bat 0.24.0 h5ef7bb8_0 from conda-forge
  These executables are now globally available:
   -  bash
   -  bashbug
   -  rg
   -  bat
Reason 5: Sidestep activation
There is also no "conda activate" / "conda deactivate" function. Instead, a
project should define all configurations in a pixi.toml and run pixi shell,
or pixi run in the project folder. Pixi automatically discovers the
environment, installs and activates it. Bonus points: pixi doesn't even need to
modify your .bashrc/.zshrc file to work!
pixi run python
# or
pixi shell
Reason 6: Use tasks to easily collaborate
Another powerful feature of pixi are
tasks. Conda does not know
about "tasks" at all. Tasks are simple entry points to a project, such as
start, build, or lint. Instead of writing Makefiles or Bash scripts with
complicated installation instructions you can make everything work
cross-platform with pixi tasks. Our goal is that users only need to git clone libfoo && pixi run start. This is also very useful in CI – check out our
setup-pixi action.
[tasks]
train = "python train.py"
test = "python test.py"
start = { cmd = "python start", depends_on = ["train", "test"] }
Reason 7: Native lockfiles
Pixi natively creates and uses lockfiles – with lots of inspiration from
conda-lock, Poetry, Cargo, and other modern package managers. When you set up
your project with pixi, you automatically get a pixi.lock file that tracks all
Conda & PyPI dependencies. Lockfiles enable really reproducible environments,
almost like a Docker container! Even the author of conda-lock describes pixi
as "conda-lock done right."
Switch from Conda to Pixi in one step
Our latest release makes it easier than ever to migrate from Conda or Mamba to
pixi. A single init command should bring all dependencies from an
existing Conda environment.yml file to a newly created pixi.toml.
pixi init --import ./environment.ymlOnce all dependencies are imported, pixi creates a lockfile and installs all
dependencies into a local environment (in a hidden ".pixi" folder). Immediately
after, you can run commands in the environment by using pixi run <command> or
start a pixi shell with the environment activated. If you are using Conda,
there is no reason to not give pixi a try - it will be like a breath of fresh
air.
If you don't have pixi yet, you can install it with a single command (takes less than 5 seconds!):
# Linux & macOS
curl -fsSL https://pixi.sh/install.sh | bash
# Windows
iwr -useb https://pixi.sh/install.ps1 | iex
See pixi in action
Early adopters love pixi. For example
Pretty bullish on replacing our Nix development environment setup with @prefix_dev. Pixi is one of the most exciting things that happened to system package management in a while, IMHO. Hope they keep going on making cross-platform package management sane!
We have lots of documentation under pixi.sh. And we are
always available on Discord for questions and
ideas.
And lastly, the following video shows pixi in action: